12. Dezember 2022 Edited Wird geladen … 10548 view(s) 8 min read
When we think of sauna stoves, we think of a spa in an all wooden cabin in the mountains or some other luxurious connotation.
It is for good reason because commercial saunas tend to be expensive. However, what if we told you that you can have the ultimate sauna experience in your own home? It is absolutely feasible to build a sauna yourself with the right tools and knowledge.
Here is our expert guide on building your very own sauna stove. This includes the genesis of wood burning sauna stoves, the benefits of using saunas, the instructions on how to build DIY wood burning sauna stoves and the safety precautions you should take before considering sauna heaters.
Follow our tips for the purest sauna enjoyment!
The History of the Sauna
The genesis of the sauna stove traces back to approximately 1112 in Finland. In fact, it is so engraved in the culture that many Finnish households and residential buildings have sauna facilities for their residents. Sauna stoves were later brought to other countries by Finns, such as to the USA and the Baltic states (particularly Estonia).
In the modern day, the sauna stoves have evolved from merely being the woodburning stoves to also including electric heaters. It is also interesting to note that the first sauna stoves were dug into the ground or set up above it on wooden logs, while later they transformed into permanent enclosed cabins such as the well-known all wooden cabin.
Benefits of Using Saunas
There are a wide array of health benefits that come with making use of saunas. These include pain relief when it comes to overexerted muscles, arthritis and even sunburn. One of the reasons for the existence of this characteristic of saunas is due to the release of hormones such as beta endorphins which takes place during a steam room session.
If you have been ill before, you probably know the home remedy that is the inhalation method whereby you lean over a bowl or sink with very hot water with a towel covering you and then inhale the entrapped steam. Well, a more luxurious version of this is a session spent in your sauna room which has the same effect of clearing up your congestion. Frequent sauna sessions also act as a preventative, not only a curative, measure and reduce risk of catching a cold by 30% as reported by Finnish researchers.
Similarly, you should be familiar with steam facials and the wonderful benefits to skin that come with steam. Well, those benefits magnify when using saunas on a frequent basis! Not only is your body detoxified by the use of sauna heat and steam, but the increase in blood circulation to your skin helps to keep it firm, supple and smooth. The heat provided and steam produced help to stimulate collagen production in your skin and they open up your pores. Investing in saunas is a sure way of cutting back on those beauty salon visits!
Aside from physical benefits and pain relief, a sauna room session also has mental benefits such as allowing you to de-stress and relax, restoring your energy and overall promoting a better wellbeing.

What you Need for Building Wood Burning Sauna Stoves
Firstly, you need to gather some tools and equipment for DIY wood burning sauna stoves. Make sure they are all nearby so that you don't have to roam around while building woodburning stoves.
Here are the items you will need:
Materials and equipment
- A metal tank – maybe an old beer barrel or an old gas cylinder (13 kg size would be good)
- Heatproof Screed to line the inside
- Flue pipe
- Hinges
- Self tapping screws
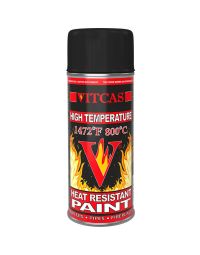
- Black Heat Resistant Spray Paint
- Angle grinder with metal cutting discs
- Large smooth pebbles/stones
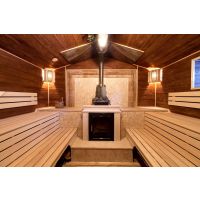
Step by Step Guide to Building a Sauna Stove
What we are going to make is the DIY version of the old pot belly type of sauna stove. These were used extensively years ago in workmen's huts, railway vehicles and barges so if you're lucky enough to have one of these already then you need go no further.
Step 1: Remove the gas from the tank
If you are using a gas cylinder, you must be absolutely sure that it is empty before you start cutting the metal. The best way is to unscrew the valve assembly from the top of the tank and then fill it completely with water. Then after emptying the water out we are sure there's no gas left.
Step 2: Prepare the stove shell
Cut off the top and the bottom of the water tank so you end up with a simple metal cylinder.
Cut out two square sections, one very near the top for adding the fuel and one close to the bottom for cleaning out the ash. Keep the pieces of metal to make door flaps over these holes later.
Cut out a hole for the flue pipe at the back of the stove and near the top.
Step 3: Lining the cylinder
Find a tube to use as a former in the centre of the cylinder so as to leave a space all round of about 50mm (2”). This could be a plastic pipe, a cardboard tube, a piece of metal ducting etc.
Coat the former liberally with any sort of cooking oil. Then mix up the heatproof screed and fill the space between the former and the inside of the tank. Push the material down and ram it as hard as you can. The material should be left overnight to set but after an hour the openings for the chimney flue and the doors should be cut out with a strong knife before the material becomes too hard to work with.
The next day you should be able to remove the former or if it was cardboard then just set fire to it.
Step 4: Attach the Doors
Like most wood burning stoves, a sauna stove requires doors to be attached to keep the heat inside.
Step 5: Locate the Stove
The sauna stove should be located on either paving slabs or on our Casa Oven Plinth. It is not recommended to locate the wood burning sauna on a wooden floor. This is to prevent fire risk.
Step 6: Attach the Chimney
The chimney is a very important component to ensure optimal ventilation and prevent fire risk.
Step 7: Make a holder for the stones
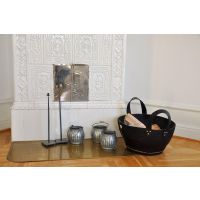
Finally, once the installation of the stove is done, you need to deal with the stones/pebbles. The stones lay on the top of wood burning sauna stoves. When you pour water onto them, it creates steam. You need to balance the pebbles on top of the stove. Here are two ways of doing this:
The first option is to create a simple tray using sheet metal. You need to curve the edges slightly so that the rocks will be in place. You can consider welding the tray to the tank’s top to hold it more securely.
The second method is to make a cage around the pipe. For this, you can utilise steel wire shelving. In this way, you can add more rocks. The tall column can be the striking focal point in your sauna room. When your holder is done, all you need to do is add the rocks.
However, we recommend to use wood for a pebble holder, instead of metal, steel or ceramics which has a risk of burning people because they will become very hot. For this purpose, you can use the materials which have been used for the sauna itself.
Finally, spray the whole stove with Heat Resistant Spray Paint.
Step 8: Insert The Stones And Enjoy Your Steam Room
That's it! Your wood burning sauna is ready to go! Once you have inserted and heated the stones, all you need to do now is give yourself a little pampering session in your very own sauna room and you will surely enjoy the ultimate sauna experience.
The sauna makes for pleasant bathing but if you add essential oils which give off a special aroma, this will make for an especially pleasant bathing experience. All you have to do to achieve this special aroma is to pour a few droplets of essential oil into the water that is subsequently poured over the rocks in wood burning sauna stoves.

Precautions About Using A Wood Burning SaunaHeater
In most cases, using wood-heated saunas makes perfect sense in terms of safety and health benefits. However, there are a few instances where you should take caution. For example, you must not use a sauna if you are:
Struggling with fertility: As the temperature increases, sperm counts decrease. Wood-heated saunas makes the temperature increase which might not be beneficial for fertility health. If you are concerned about fertility, it is not recommended to use woodturning stoves.
Have skin problems: Sauna increases blood circulation and blood flow which can bring nutrients to your skin. However, for certain skin conditions, sauna stoves are not recommended. If you have acne, eczema or rosacea, a sauna can exacerbate your condition.
Take medications: Certain medications are not suitable to use with exposure to heat and a high temperature. If you are on medication, you need to consult a doctor before using saunas.
Suffer from heart problems: Sauna sessions can work your cardiovascular system. However, if you are suffering from heart problems, you must consult your doctor before using saunas.
In any case, if you have any health problems, including those not mentioned, you must consult a doctor before you use wood heated saunas.
Conclusion
A wood burning sauna or steam room is an enjoyable add-on to your home that is not reserved only for the privileged and is not only limited to commercial saunas at the local spa. You can enjoy the ultimate sauna experience in the safety and privacy of your own home when you build your own steam room.
Our guide outlines how you can build your very own sauna wood stove. Once you have built the wood burning sauna, there are so many ways in which you can customise it and experiment to create the DIY sauna stove you envision. Whether you prefer a classic design or a more unique, special design of wood sauna heaters, you have the free reign to be able to create the sauna of your dreams.
For the purest sauna enjoyment, check out our products suitable for wood burning sauna stoves and other types of sauna stoves, found in the Sauna section.
More products for wood burning stoves, you can find in our shop in the Fireplaces & Stoves section.